Tag Archives: Tessuti Fabrics

Tessuti Skylines Competition

I had it in my head that I wanted a floaty, ruffly, backless, maxi dress. The challenge was in producing a dress that wasn’t too girly in such a (potentially) twee fabric. The fabric is really, very beautiful though. It’s a linen blend, with a lovely, crinkly texture that becomes more apparent after washing. I’m not one who likes my linen crisp. I love the way linen fabric creases and crinkles.

The design is my own, but I’ll talk you through it a bit. I honestly believe that if you have a couple of different well fitting bodice patterns in your stash, you can make virtually anything from them. This started off as a standard princess-seamed bodice that I had draped to my shape months ago. I modified the design to remove the shoulder seams so I could attach straps instead. I also lowered the back to not much more than an inch above my waist. And I lowered the back waistline to create a slightly hi-low look at the waist seam. I further exagerated the hi-lo effect in the first skirt panel, but kept the last gathered, skirt panel as a very long rectangle.

The bodice is detailed with bias binding that I cut as one inch strips and left the edges raw. I love the slightly frazzled look of well-considered, raw edges in fashion right now. I seamed these into the princess seams, the waist seam, and on either side of the back zipper. As they are cut on the bias, they shouldn’t really fray too much with wear, however I am looking forward to them looking more pronounced and “ruffled” after a few launderings.

To help keep up the weight of the skirt, I added a waist stay to the dress. This is basically a soft petersham ribbon handstitched at points along the waist. I cut up an old bra for the closures. I used the cups from this same bra to add a little shape to the front of the dress. I toyed with inserting the cups properly under the lining before I attached the skirt, but I think they may annoy me down the track, in which case I can still easily remove them.

I can tie the back in a few different ways, but my favourite is the backless version you see in the majority of the photos.

I’m very pleased with how this dress turned out. It’s a fancy dress, made from a very down-to-earth fabric. I love the contradiction in this. It’s something that I would feel very comfortable in dressing up to wear to an important occasion.

Burdastyle paper bag waist shorts

These are my new favourite shorts. I need more of them. In linen. A pants version. A whole closet full would be nice.

The pattern is Burdastyle 111A shorts style. I made a few small modifications.

  • I omitted the front fly (might have been a faux fly…)
  • I also ommitted the belt carriers
  • I stitched down the facing and created an elastic casing as I did this. The shorts do not include an elastic waistband, but I wanted a pair of easy, comfy shorts that could be pulled on (as well as tied up with a big bow!).

I love my new shorts. The linen is from the Fabric Store; a most divine shade of Military Green. I love the exagerated paper bag waist of the design. I’ve been wearing them with a silk tank I made ages ago. The very pretty charmeuse is an oldie from Tessuti Fabrics. I can also see myself wearing these shorts with a billowy, white linen top in Fall.

Vogue 1027: a faux wrap dress

At some point, I must have decided that I needed more Summer neutrals in my closet. What better than a DKNY jersey dress in the most beautiful, weighty viscose. I’ve used several different shades of this viscose jersey over the years. It always sews up really nicely.

I’m also quite fond of Vogue patterns. I find they fit me very consistantly. I can make my standard adjustments and sew up the pattern right off the bat, without a muslin. My standard adjustments are 1/4 inch extra width through each shoulder seam, and lengthening a 1/2 inch through the bodice (#sewingtall). I usually also lengthen the hem length.

I didn’t bother with lengthening the skirt because I wasn’t planning on hemming the fabric. I prefer to leave a weighty viscose in a skirt like this with a raw hem. I feel like it looks a lot cleaner than a hem. However, having said that, I did follow the rest of the pattern instructions properly, which involved facings on the sleeves and a hemmed neckline. They worked out beautifully.

The measurements on the pattern envelope correspond very well to my actual size. I believe my dress reflects what I see on the pattern cover. I did make a few observations on the design, mostly relating to my fabric choice.

1. The waistline is supposed to be higher. Mine does technically sit in the right spot, but the weight of the fabric in the circle skirt pulls the dress and stretches the bodice down. Furthermore, I’ve folded the fabric belt half down to cover my elastic seaming below the waistline. I believe the belt is supposed to be folded up completely, again shortening the look of the bodice. It’s a catch-22. I adore the drape of a weighty viscose, but it does make for a heavier dress.

2. The instructions say to create casing for elastic with an extra seam below the bodice seam, using the seam allowances from inside the dress. Looking at the pattern cover, I’m not convinced that they did this step. I don’t like the look of this seam line on the finished dress, so I’ve tried to hide it with the belt. Also, measure your own waist to determine the elastic length required. Their measurements here are completely off. My elastic probably isn’t tight enough to hold the heavy skirt up adequately, but I was wary of too-tight elastic being uncomfortable and creating too much “gathering” through the waist seam.

3. Considering the 4-way stretch of my jersey, I probably could have sized down through the waist and skirt to achieve a more snug fit (which I feel would suit the style of jersey I used). I also wonder what the crossover bodice would look like if I ditched the pleats (I certainly don’t need the space with my bust size!). I’m not unhappy with the way this dress turned out. The bodice fit is good, and the shoulders are comfortable. And the dress even has pockets!

I will definitely sew this pattern again, maybe in a bit more colour next time. Meanwhile, I can see myself wearing this dress quite a bit over the next few months.

Grainline Archer refashioned

Unless my memory fails me, this was the second Grainline Archer I ever made. I think I ended up getting the fit right on my third try. I still wore the original version of this shirt, but it’s become way too tight across my shoulders since my return to the pool.

It was time to put this shirt to better use. I was lucky enough to have a decent sized remnant of the original fabric in my stash which meant I could go to town with my flounces. As beautiful as they are, flounces are very big fabric hogs!

I wish I took photos of my refashion during the process. I didn’t. However, I’ve drawn a few diagrams to help. It wasn’t a complicated refashion. I started by cutting off the sleeves of the shirt. Then I pencilled my intended seam on the remainder of the shirt. The diagram below shows the new seam I created. The front seam is red (on the front shirt pieces) and the back seam is green (imagine it on the back shirt pieces). Both are connected at the shoulder seam. I wanted the diagonal seam to be wider at the shoulder yoke seams and more medially placed towards the shirt hem. I brought the seam closest to the CF in the front of the shirt. The scariest bit was cutting along this seam and keeping both sides exactly even! After cutting, I then had three shirt pieces that I needed to stitch back together, taking into account the new seam allowances that would be eating into my shirt size!

For the flounce, I simply measured the entire length of the new seam and used that as a reference for the curved edge of a flounce. A flounce pattern piece is basically a big circle. I made mine a bit wider at the centre point (the area covering the shoulders). I also added an extra four inches (approx.) to the length of my flounce as I knew I wanted to add a couple of pleats over the shoulder region. The diagram below is an approximate representation of my flounce piece. Imagine it trued and smooth in real life!

I faced the flounce with self-bias-binding before I sandwiched it between the pieces of shirt. And once the flounce was attached and the shirt was in one piece again, I tried it on. I used 1cm seam allowances with my new seam so I knew that I lost exactly 8cm in shirt girth by inserting the flounce (2cm on each front and back seam). To compensate this, I decided to add contrast white panels down the sides of the shirt. This alteration in turn, would eat up another 2cm on each side of the shirt. So, I measured 8cm wide panel pieces to attach to the sides. The panel width is 6cm (incl. 2cm of seam allowances). These side panels returned the shirt to the same shirt-fit as before. I then bound the armscye and hemmed the bottom a little straighter and shorter than before.

I’m not joking when I say that this is my new favourite skirt. I’ve already worn it a lot. It pairs beautifully with skirts for an elegant evening look. But I also love it with jeans when I’m aiming for polished casual.

Itsy bitsy Heiress Bikini and rashie

Sharon, from Swimstyle Patterns, contacted me a few weeks ago to see if I’d like to try one of her patterns. I was under no obligation to blog about it, but I’m very impressed, so I want to share my experience.

I’d already discovered this Australian indie pattern maker a few months earlier via Instagram so I knew what patterns she had to offer. There were two main reasons why I hadn’t already purchased any patterns off her myself. It was mid-Winter here! Also, I don’t wear bikini’s very often. I’m not opposed to a good bikini. They just don’t suit my lifestyle (which involves real swimming, rather than sunbathing). And on the odd occasion that I might be lazing around a pool, I’m always in hiding from the sun, covered up from head to waist with a long sleeve rash vest, thus rendering a bikini pointless anyway.

There are lots of swimsuit patterns out there, including vintage, indie, and modern. I’ve sewn more than a few of each. However, it’s still hard to find style lines and sophisticated construction techniques that replicate RTW. I work in a high end clothing boutique once a week (and do the odd modelling job for them as you may have guessed from my IG feed!). On Saturdays, I spend my time studying, styling, and fitting designer clothes, mainly on customers (but sometimes on myself too ;-)). One such item I was admiring recently was a very cute bikini by Milly. I especially loved the seamless design and the simple, yet flattering shape of the separates. The Heiress bikini has a very similar seamless design, so I was quite keen to try it out.

I cut a size 10 for the bikini, which corresponds very closely to my measurements. The top portion is drafted for a B-cup. I’m an A-cup on a good day, but I wanted to trial the pattern first before I attempted any modifications.

The fabric I used is not your traditional swimsuit fabric. It’s actually a double layer of swimsuit fabric, bonded together. This makes it extra thick (a little scuba-like), extra flattering, but with a little less stretch. I think it makes the bikini top extra supportive, but perhaps the reduced stretch also makes the bottoms a little skimpier.

The bottoms are actually a perfect fit (albeit in a very cheeky style!). The seamless design makes for such a pretty finish. The top would be perfectly suited to a B-cup. I think (given the stretch of swimsuit fabric and style of cut) it would probably look great on a C-cup too. It’s a little “empty” on me and since I don’t need or want padding in my swimsuits, I’ll probably give it away.

I’m keeping the bottoms though. I have another top underway that I’ll pair with the rashie below (also by Swimstyle Patterns). Ideally, I would have made this up in the long sleeve version (sun safety all the way here!) but I just didn’t have quite enough fabric. I sized down in this pattern, and then adjusted the side seams further as I made it. Swimsuit fabric is stretchy and I like my rash vests to fit like a second skin. That way, you almost forget you are wearing one. I could probably still bring the seams in a smidgen around the waist and arms. I’m amazed at how many loose-fitting, oversized skinsuits and rash vests I see people wearing in real life, especially poor kids. They must feel so unpleasant and heavy when wet!

The other great thing about this bikini pattern, is that there is a free pattern hack for anyone wanting a bit of extra butt coverage. There are also more strap options for the top. I chose the halter version, but there is also an adjustable strap version, and a really neat cross back hack available.

Esther shorts and a little refashioning

The Esther shorts pattern is a very old tried ‘n’ true pattern for me. I’ve lost count of how many times I’ve sewn them up. I love the high waisted design. My preference is to sew them up in a medium weight, cotton/elastane (2-3%) blend. And given the frequency with which I’ve made them, that is probably all I need to say on the matter.

I’ve also been doing a bit of refashioning around these parts (nothing new, you say!). One of my favourite, casual, silk dresses was getting a little old and starting to look a bit too sheer in the skirt. The logical solution was to chop off the skirt. Now it’s a cute little top!

I didn’t waste the skirt portion though. The pale, neutral colours of the silk have made it a great option for lining a little Summer dress for Miss Eight. More on that one later though!

Simplicity 1366 in black lace

I made a few mistakes when I was a beginner at sewing. I was sucked in by every pretty quilting cotton, which of course I was never going to use. I also snatched up Liberty of London remnants when I saw them. Why? Liberty looks cute on other bloggers, but have you ever seen me wear Liberty of London?

Another thing I used to do was buy completely inappropriate amounts of fabric for a project. I lived pretty close to my favourite bricks and mortar stores in Sydney, and yet I still harboured a morbid fear of winding up short on a make. Remember this dress? Now, please note the very small amount of lace I used for the back insets. Past-Debbie purchased a good 2.5m of that lace, just to make sure she had enough… The remnants had been in my stash since 2012.

It was nice to finally put this great fabric to good use. I used Simplicity 1366 with a few modifications.

  • I extended the inside shoulder seams to create a closely fitted neckline. I worked out the gradient of the extended shoulder seam very scientifically. I put on an existing Simplicity 1366 top and eyeballed the shape and length of the new shoulder seam. I think I got it pretty spot on.
  • I also added a high collar. This was super easy, since the lace had perfectly shaped rick rack panels.
  • Because of the high collar, I added three buttons and a keyhole/slit back for back fastenings.
  • I lengthened the sleeves and added jersey cuffs.
  • I lengthened the body a smidgen and added a jersey cuff.

I love my new top. It’s a great addition to my Fall wardrobe and I love that it works equally well with jeans and trousers.

Black trimmed lace dress

I made this dress some time ago and entered it into the Tessuti cut out lace competition. However, I always had bigger plans for it. Here are some updated photos.

blace2

blace9

Pretty much all the details are the same as before. I simply unpicked all the extra overlay that I’d handstitched in place over the shoulder straps, and turned the black trim back to the outside. There was a little seam-ripping and re-sewing involved but it was worth it (and easier because I’d made allowances for the changes to begin with).

blace10

Now it’s just a shame that Summer is edging away from us. I’ve probably only got a few weeks of lace left but I will enjoy it while I can.

blace12

blace7

blace4

blace12

blace6

Let’s talk about swimsuits

Not all bathers are meant for swimming. And by swimming, I mean actual laps, freestyle at a pace, butterfly, and flip turns. I have no tolerance for togs that bag out, grab air bubbles, or shift over my bust as I swim. I’ve always stuck to Speedos for my training, racing, and now lap-swimming togs, fiercely loyal in fact. But there could be an extra challenger soon. Me.

fs11


I loved my Splash swimsuits, but they weren’t designed for lap swimming. Even so, they worked really well when worn with a rashie over the top half (halter necks just won’t do for real swimming!). This Summer, I’ve been wearing my tiger one-piece mostly. I’ve been playing with the kids, hanging at the pool, and swimming lots of casual laps in it. The fabric has held up beautifully. The design worked well enough, but doing so much swimming also gave me lots of time to analyse the features that needed to be changed.

It was a smidgen too short through the body. The cross back was positioned too high which meant I could feel it across my shoulder blades as I rotated my arms. Also, whilst I loved the novelty of low cut, full bottom bathers last season, I just wasn’t feeling this trend any more. A higher cut leg was calling, not just for the look, but also for functionality and range of movement. Either that, or a to-the-knee bike short style, but I wasn’t going there.

In fact, all this pondering about swimsuits got me thinking about the evolution of competitive swimsuits and the use of technical fabrics (and non-textiles). I ushered swimming out of my life around 1996. Around that time, we raced in ultra small, skin-tight suits, and occasionally what we called ‘paper suits’. The ‘paper’ lycra was developed in 1988 for the Seoul Olympics and the Australian swim team swam in them at Barcelona. This swimsuit fabric was different to normal lycra. It was extremely thin and felt very crisp and dry to the hand. Even the dark colours were semi-transparent in the light. The fabric was strong, extremely lightweight and we wore them skin-tight and a few sizes too small. They only really lasted for one competition. I was fortunate enough to swim under the guidance of a national coach, who bought back souvenirs that he swapped at international meets. That’s how I got my hands on a paper suit, and the ribbed swimwear I’ll talk about later. By the time I swam at an international meet, in about 1995, the swimsuits were back to being regular lycra and ultra small (for a brief window anyway).

More technical, ribbed fabrics started coming in just as I was signing off, but these were still a woven textile. I had an Aquablade catsuit that was really just a high-necked swimsuit. The fabric was designed in a striped print, created by the addition of water-repellent resin.  It was supposed to increase the speed of water flow over the suit. The picture below is the best I could find (from the Powerhouse Museum of Sydney, Swimsuit collection). I might still have my suit hiding somewhere in a box in Australia.

66650

The history that follows this is even more fascinating. In 2000, Speedo introduced the Fastskin suit that was said to mimic sharkskin, with ridges and bumps to channel water around the body. They covered most of the body, wrist to neck to ankle. These suits were approved for the 2000 Olympics and 83% of the medals were won wearing them.

2000

In 2008, Speed then launched the LZR racer swimsuit, which they developed in conjunction with NASA, the Australian Institute of Sport, and an Italian company, Mectex. The patented technology for these suits apparently increases blood flow to the muscles, compresses certain parts of the body, and holds the body in a more hydrodynamic position in the water. Suits were also designed specifically to match the stroke being swum and the different pattern of movement/muscle use in that stroke. The “fabric” consisted of woven elastane-nylon and 50% polyurethane. The seams are ultrasonically welded together, rather than stitched! Other companies followed suit with similar technology, making their suits out of up to 100% polyurethane.

Unveiling_of_LZR_Racer_in_NYC_2008-02-13

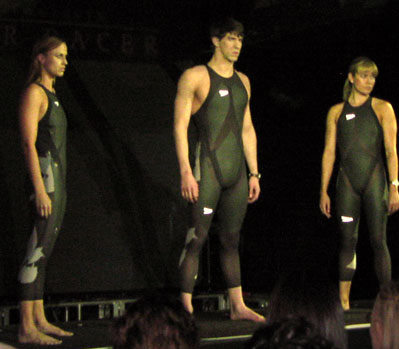
LZR racer by Speedo 2008

Prior to the Beijing Olympics, FINA endorsed these suits. At Beijing, 23 of 25 world records were smashed, and 94% of races were won wearing them. It was suggested that these suits resulted in times being swum 2-4% faster, which is hugely significant in a fixed environment like a swimming pool. By 2009, 130 world records had been broken by swimmers wearing these non-textile suits. FINA backflipped and the suits are now banned. Yet, those records still stand.

Current policy states that swimsuit fabric must be a textile, which is defined as any open-mesh material like cotton, nylon, lycra, etc. So, no more polyurethane with welded seams! There are also regulations on how much of the body a swimsuit can cover. A good example is what you may have seen all the swimmers wearing recently in Rio (ignore the two-piece!).

341B16DC00000578-3588178-image-m-26_1463108141109

Meanwhile, back in the normal world, I’m just focusing on a very basic design, in a definitive textile of course. No chance of me being banned from any local pools any time soon! Even after all the modifications, my suit is still not perfect, but it is pretty close to meeting all my needs! The length is great. The cross back feels as though it is in a much better position but I’ll have to do some swimming to test that out properly. I love the bottom half of the bathers. The bottom coverage is perfect and I feel like I got the leg cut just right. I like the way the sides come forward a little more than a generic suit, and the back comes up a little higher. Next time, I’ll widen the bust area a smidgen. I might also have a go at lowering the back to a more traditional swimsuit height.

fs10

fs8

fs6


Cut out lace dress 2

I never intended to make two dresses with this fabric. I had less than a full panel remaining after finishing my main entry. I toyed with turning the leftover bits of lace into a top for one of my girls, but my sewjo just couldn’t get behind that idea. It seems that I needed another white lace dress in my closet.

lla5

I spent way too much time mulling over the positioning of the lace, perhaps even more so with this one because my options were limited. To achieve symmetry with the scraps I had on hand, the bodice had to be seamed down the CF in addition to the princess seams. I didn’t have much choice with the lace placement for the skirt. I like the way I was able to place the lace in the front and whilst I also like the back, it’s perhaps not as cohesive through the sides as I would like. The dot-lace hem is seamed on.

IMG_1235

Design-wise, this dress is very similar to my previous entry. The princess-seamed bodice is almost the same, but with a slightly more scooped out neckline and skinny, self-fabric straps. The skirt portion was modified from one of my TNT pencil skirt patterns. I slashed and spread the pattern slightly into a subtle A-line shape for a more casual fit. I absorbed the back darts through the flare and back waist seam.

lla4

The bodice is unlined, but the skirt is lined. I faced the neckline raw edges with bias binding. The skirt is lined with a beige coloured acetate. I kept the skirt lining as short as possible so as not to be seen through the bottom panel of the hem. I won’t be bending over in this dress!

lla11

lla14

lla10

Like my other dress, this dress is also designed to be worn with a very specific bra (the one I wore in the last lace dress post). You can see that the bodice fits a lot better when I wear that bra here (and I will be wearing it in real life). It is mostly unseen behind the straps, but for a cleaner look in some of these photos (since I didn’t have a wardrobe assistant on hand to check for strap visibility), I decided to wear a strapless bra. The fit is just not as good across the bust when I have to resort to a strapless bra. It’s a very good reminder of how undergarments affect the outer fit.

Also, try to ignore the big smear of white paint across my calf… maybe we should start a game called, “Spot the Paint on Her”, in all my blog photos for the next six months….

lla6

lla7