Category Archives: self-drafted

Halston knock-off trousers

I was lucky enough to do a bit of modelling a few months ago and I got to wear a pair of amazing Halston pants. They weren’t even in my correct size (there was a bit of back-clipping involved), but I still fell instantly in love with them. The light, drapey fabric screamed Spring, and I just loved the large overlapping pleat at the front. Needless to say, I examined them very closely and took a lot of photos.

There are a few sewing patterns out there that are reasonably close in style, but nothing that is actually the same. The Ebony pants by Style Arc have a similar feel, but are pull-on, elastic waist pants with a mid-rise. The Halston pants are high waisted, with a regular waistband and back darts, symmetrical pleats next to the front pockets, and a centre front invisible zipper hidden beneath a large front pleat. What may seem like small design differences can make the world of difference to how a final product feels and looks. I felt it would be simpler for me to start with a well fitted pair of trousers and adjust the design from there. It’s not hard to cut and slash a few pleats. That’s all the overlapping pleat is in the front. It’s just a pleat that begins at the CF, at the same position as the zipper.

My pants are far from perfect. This was a wearable muslin (so I’m not too worried about the waistband puckers). I used the most hideous, poly suiting from Joann. I almost wish I’d spent a bit more now since they worked out better than expected. I could stand to add a half inch to the crotch length to bring the pants a little higher to my true waist. I also need to straighten my side seams by adding to the back and taking from the front and vice versa. See how my outer leg seam curves around to the back.

I love the look of pink silk with grey. But in real life, I’m most comfortable pairing these pants with a white shirt and wool boob tube. It’s just a little hard to show off the neat front pleat of the pants in this way though!

Swimmers swimsuit V1

If you follow me on Instagram, you may have seen that I’m on a mission of sorts. I’m determined to perfect a couple of swimsuit designs, both for myself and my daughters.

Swimming is slowly becoming a big part of our lives, so it makes perfect sense that my sewing table would reflect this. We’re at the pool most days. I’m like a yoyo, driving the kids to the pool in the afternoon, and then back again on my own as often as I can. After nearly a year of talking about it, I’ve finally joined the Masters and I LOVE it. Swimming in a squad is nothing like swimming on your own (I’ve been kidding myself for months). During each session my hypoxic lungs and burning arms body remind me just how out of swim-condition I am, but also, just how good it is for me.

I’m currently working on three styles of swimsuits. One is a kid-style. I don’t like seeing kids in swimsuits that are too skimpy through the bottom and sides (like my suit design in this post!), but I also don’t like the racerback to be too wide. Whilst I would still recommend Jalie 3134 for kid swimsuits (and at this point, I can’t actually think of a better sewing pattern out there for the specific purpose of squad swimming), it just wasn’t the perfect swimsuit pattern for this very picky swim-mum. I’ll still sew Jalie 3134 again, but I’ll probably reserve it for when I have smaller fabric scraps to use up. There’s some great panelling on that pattern.

In terms of the issues, I found the crotch of Jalie 3134 pattern a little too wide and the fit around the bum and lower back less than ideal. If you look at the woman’s back view picture on the pattern cover, you can see the gathering/wrinkles I’m talking about. It’s really no big deal, but I know a better fit is possible. I also don’t like the side seams on this pattern. I feel like you can get a better fit through the lower back/sides with a slanted side/hip seam that is positioned more towards the back of the suit, as opposed to a straight side seam connecting the front and back. A straight side seam also adds bulk to the underarm zone, which can cause pretty horrific chaffing if you don’t nail it during construction. But even then, you really don’t want an underarm seam in bathers if you are doing serious swimming. Again, I’m nitpicking here, but I’ve had a lot of hands-on, personal experience with swimsuits over the years.

The other two designs are just for myself. I’ve photographed the skimpier style for this post. I’m quite pleased with how it turned out but it’s still a little short in the body. I just need to add a little extra length/width to the upper bust area and then I think I can file this pattern away as done. I have another suit design on the cutting table that will provide a bit more coverage through the sides and back, with a back that looks more like the kid version.

Like the Jalie design I discussed earlier, my first two swimsuits (here and here) also had a straight side seam. Why? Because it’s easy to draft. Removing that straight side seam hurt my brain a lot, but it worked. Compare the seams in the photos below. The top (green cherry) suit is Jalie 3134. It has all the fun seaming. The bottom (buzzy bee) suit is my design. My accidental pattern-matching makes the seam a little hard to see in the buzzy bee suit, but you can see it better here.

I tried it out first on Miss nearly-Nine’s suit. Then I used the same principles to create similar designs for me.

I’m getting closer with the kid-suit. I messed up the neckline in this first draft, so I had to cut off the top binding and add pleats just to make it wearable (there’s no way I was going to waste a swimsuit with Summer on the way!). The fit through the back is pretty spot on though.

My next version also worked out really well. It was actually intended for my biggest girl, but we realised that Miss Seven needed it more. And since she’s chomping at the bit to join her big sister in the swim team, we all thought the buzzy bees should belong to her. Miss Seven is almost as tall as her big sister, but just a smidgin narrower through the waist and hips. I wasn’t able to catch her to photograph the swimsuit dry, but it was rigorously tested in the water yesterday. In fact, I was lucky to catch this one for a photo, full stop.

A Summer dress

Apparently you guys like pretty dresses, well those of you who follow me on IG do. My top posts of 2016 are pretty much all the dresses. I hadn’t even blogged about this one and it still made the cut.

I made this one using a large remnant of vintage linen, thrifted from an estate sale. The textured windowpane fabric was from a small length purchased on whim from Tessuti Fabrics some time ago. I think the blue pairs perfectly with it.

The pattern is modification on a self-drafted princess bodice that fits me perfectly. You’ve seen me use different versions of this bodice all Summer (here, here, here, and here). The skirt is just gathered (with pockets of course!). I was after a cool, easy-to-wear, Summer dress.

I was worried about the straps being too stiff, but I’m glad for their sturdiness now. And they don’t feel too stiff when I wear the dress. They actually feel comfortable and secure. I hate flimsy straps that feel like they may stretch out or tear. Instead of creating tubes and pressing flat (as I’d normally do for a strap of this width), I used wider lengths of linen, folded the raw edges in and then in on themselves again, and then topstitched both edges. It means that there are four layers of linen in each strap, perfectly suited to holding up the weight of a midi-length, gathered skirt.

I’m a big fan of the midi length dress. It’s an easy length for tall ladies to wear. I know I’m going to get a lot of wear out of this, maybe even sooner rather than later!

IKEA shift dress and flared sleeve tutorial

I’m not sure if it is a parenting flaw on my behalf, but my three girls consider a trip to Ikea worth bargaining for. They love visiting Smaland, even though it’s always a small miracle if there are ever enough spaces to take them all in. But even if they don’t get in, they’re at an age now that it is really quite enjoyable walking around and finding things together – things that we never knew we needed.

This is not the first time I’ve been fabric shopping at IKEA. A few years ago I made made curtains, bento bags, and a couple of small dresses with IKEA fabric. This time around, I purchased two yards of stiff cotton with the intention of making a midi skirt or a shift dress. It seems that the shift dress won out in the end.

The pattern I used is based on this floral dress from last year. It’s a very basic, self-drafted shift dress, with flared extensions added to the sleeves.

There are plenty of patterns you could use to acheive this simple design.

  • Vintage shift dress patterns are a dime a dozen. Ebay and Etsy both have heaps. I’ve just looked!
  • Papercut Patterns Sea-Bell dress is a more fitted style, but quite an expensive option for such a simple dress.
  • Megan Nielsen Dove top is another to consider. It would be easy to extend into a dress, and the sleeves are already done for you.
  • The Tessuti Fabrics Maggie Tunic would work well with the addition of flared sleeves.

The above sewing patterns are options, but if you already have a TNT, darted T-shirt, shift dress, or even a nice sheath, it isn’t difficult to add flared sleeves. All you need to do is measure the circumference of the sleeve you are adding to and decide on the length of flare you want.

First, decide which dress/top pattern you want to use:

Now it’s time to create the sleeve extension:

And there you have it. Flared sleeves couldn’t be easier!

Black trimmed lace dress

I made this dress some time ago and entered it into the Tessuti cut out lace competition. However, I always had bigger plans for it. Here are some updated photos.

blace2

blace9

Pretty much all the details are the same as before. I simply unpicked all the extra overlay that I’d handstitched in place over the shoulder straps, and turned the black trim back to the outside. There was a little seam-ripping and re-sewing involved but it was worth it (and easier because I’d made allowances for the changes to begin with).

blace10

Now it’s just a shame that Summer is edging away from us. I’ve probably only got a few weeks of lace left but I will enjoy it while I can.

blace12

blace7

blace4

blace12

blace6

Flared sleeve shirt refashion

I’ve always been a bit partial to a statement sleeve. And right now, flared sleeves, bell sleeves, and even gathered sleeves are just about everywhere.

I want to share with you a quick way to update an existing collared shirt, or any shirt for that matter. I started with a a basic white button up. Mine was purchased from Target for a grand total of $22, specifically with this project in mind. I toyed with the idea of sewing myself a shirt from scratch for all of five seconds. But as you should all know by now,  I’m not so in love with sewing basics.

fl6

I started by cutting the cuffs off a basic shirt and with them, about six inches of sleeve. I then measured the circumference of the cut portion of the sleeve and used that as a guide to draft the new cuff.

img_1653

I drafted a new cuff (just a big rectangle) that measured 8.5 inches in width and 12 inches in length (including a 5/8″ seam allowance). The cuff width allowed for a three inch overlap, to line it up with the underarm sleeve seam when sewn in place. I then slashed and spread the cuff to turn it into a flared design. See the picture of the new pattern piece (below) to get an idea of the amount of flare. The pattern piece is cut on the fold and two cuffs need to be cut (one for lining, one for outer fabric).

img_1654

Because of the size of these new cuffs, I chose not to interface them, which turned out to be the best decision. I also played around with the position of the overlap/slit of the cuff and found it worked best (appearance and practicality) when it was positioned on the underside, with the back overlapping the front. This positioning suits the natural movement of the arm better.

fl3

I’m delighted with my modified white shirt. I’m currently considering which other shirts in my wardrobe might need a similar update.

fl5

fl2

fl4


Cut out lace dress 2

I never intended to make two dresses with this fabric. I had less than a full panel remaining after finishing my main entry. I toyed with turning the leftover bits of lace into a top for one of my girls, but my sewjo just couldn’t get behind that idea. It seems that I needed another white lace dress in my closet.

lla5

I spent way too much time mulling over the positioning of the lace, perhaps even more so with this one because my options were limited. To achieve symmetry with the scraps I had on hand, the bodice had to be seamed down the CF in addition to the princess seams. I didn’t have much choice with the lace placement for the skirt. I like the way I was able to place the lace in the front and whilst I also like the back, it’s perhaps not as cohesive through the sides as I would like. The dot-lace hem is seamed on.

IMG_1235

Design-wise, this dress is very similar to my previous entry. The princess-seamed bodice is almost the same, but with a slightly more scooped out neckline and skinny, self-fabric straps. The skirt portion was modified from one of my TNT pencil skirt patterns. I slashed and spread the pattern slightly into a subtle A-line shape for a more casual fit. I absorbed the back darts through the flare and back waist seam.

lla4

The bodice is unlined, but the skirt is lined. I faced the neckline raw edges with bias binding. The skirt is lined with a beige coloured acetate. I kept the skirt lining as short as possible so as not to be seen through the bottom panel of the hem. I won’t be bending over in this dress!

lla11

lla14

lla10

Like my other dress, this dress is also designed to be worn with a very specific bra (the one I wore in the last lace dress post). You can see that the bodice fits a lot better when I wear that bra here (and I will be wearing it in real life). It is mostly unseen behind the straps, but for a cleaner look in some of these photos (since I didn’t have a wardrobe assistant on hand to check for strap visibility), I decided to wear a strapless bra. The fit is just not as good across the bust when I have to resort to a strapless bra. It’s a very good reminder of how undergarments affect the outer fit.

Also, try to ignore the big smear of white paint across my calf… maybe we should start a game called, “Spot the Paint on Her”, in all my blog photos for the next six months….

lla6

lla7


Cut out lace competition dress

I know I should sit on my competition entries like everyone else, but it’s like sitting on a hot potato, especially since I couldn’t wait to get started on this one. It’s finished, photographed, and I’ll be squeezing in as many wears as possible before Fall, so I figured I might as well share it! The inspiration came from THIS dress that I posted on my IG account a few weeks ago.

As soon as I saw the ivory lace, I knew exactly what I wanted to make with it. The only problem was that the rules stated that no trims could be used and that the outer fabric of the garment had to be made entirely of the competition fabric, and in a single colourway only. That was a big problem. The contrasting black trim against the ivory lace was the element that I most liked about my inspiration dress.

alace12

It took me a bit of thinking to come up with a solution, and a LOT of hand-stitching post construction. However, I found a way to keep all my black trim to the underside of the lace fabric and in a manner that I could reverse in the future. With the trim kept to the inside, the contrast is muted through the lace, but still visible as a subtle feature.

This is a post about my competition dress. I will share more pictures one day after I have unpicked all my handiwork to reveal the black trim again.

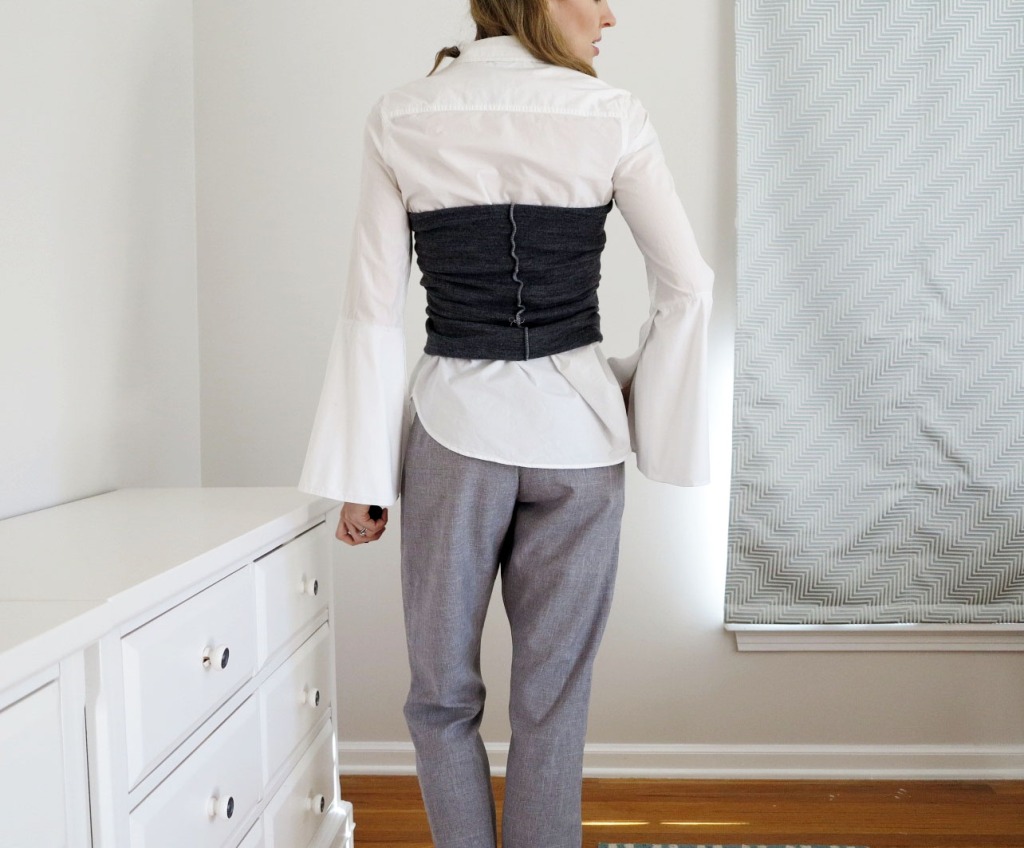
I designed this dress using a combination of flat pattern-making and draping. I tried very hard to design a bodice that would be low cut (and slightly shaped) in the back, yet with straps that would conceal my favourite bra. I think I did a pretty good job.

alace9

lace4

lace5

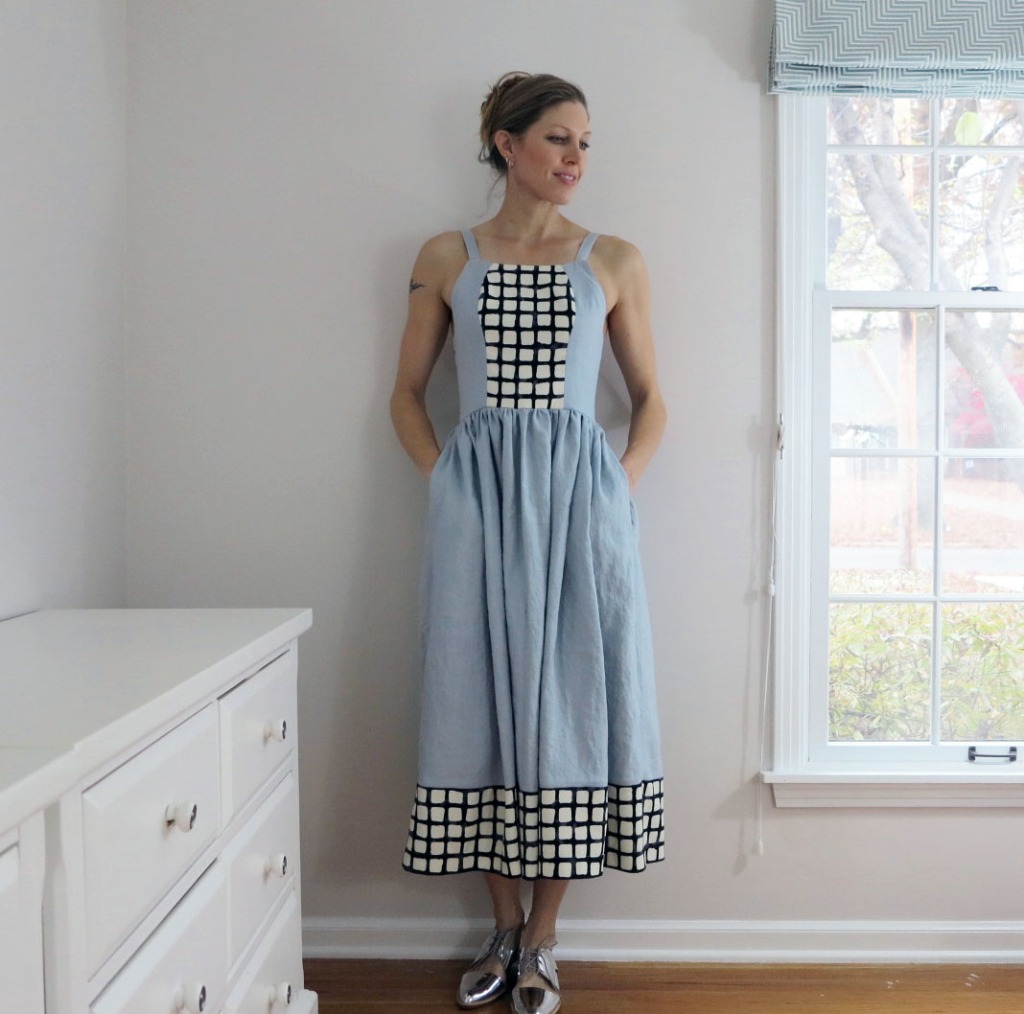
I also tried to position the lace in such a way as to avoid lining the bodice. I wanted the dress to show glimpses of skin through the lace rather than lining. But I also didn’t want the dress to be too revealing. The bodice isn’t lined at all but the ruffle provides a little extra coverage. The skirt has a short lining. I couldn’t quite manage to place the lace of the skirt in such a way that would cover my bottom completely.

The lining I used for the skirt is an ivory/beige coloured acetate. I gathered the lining in my dress rather than pleating it because I wanted to add a bit more bulk through the skirt. And that is the beauty of sewing your own clothes. My hips are narrower than my shoulders and this difference gets a little more pronounced the fitter I get so a gathered lining in the skirt helps me achieve an illusion of filling it out better and having a more hourglass figure. (I blame Pokemon, the Olympics, and active kids for getting me out running and swimming laps everyday this Summer!).

I made the straps using wide, black, foldover elastic (FOE). The gathered sleeves are sandwiched between the fold and then the entire length of the elastic is stitched down to create an enclosed strap. I used a very strong/stable FOE. Too much stretch would have made for weak straps, but a little bit of firm stretch and a lightning stitch creates very comfortable and strong shoulder straps.

download (1)

The sharp contrast of black against ivory in the shoulder straps was what my heart desired, but I compromised by using it as a strap lining instead. I created lace tubes to cover those black elastic straps and hand-stitched them in place. I’ll remove those lace tubes at a later date.

I also encased the edges of the lace ruffle in black, self-made, silk binding. I then turned that trim to the underside and hand-stitched it in place. I like that I can still see a glimpse of the black through the lace. To cover the very edges of the black binding (near the neckline and CB zipper), I cut tiny squares of the competition fabric and appliqued them over the visible binding. The result is a dress with outer fabric made completely of the competition lace.

alace2

lace7

alace6

I’m so pleased with how this dress turned out. I will definitely enjoy wearing it during the last few weeks of Summer. Meanwhile, there’s still plenty of time to enter the competition and if you don’t like ivory lace, there is also red and black to choose from. I have less than a full panel remaining of my ivory lace, but I think I’ve just worked out a way to scrapbust it into another little frock!

alace5


One shoulder top… times two…

What do you do if you can’t decide if your top should have a sleeve or not? You make both versions of course!

download

I originally only had the sleeved version of this little one-shoulder top in mind, but that changed mid-construction. I left the sleeve off the first version, but since I’d already cut the sleeve, I decided to follow through with the sleeved version too.

The fabric is a vintage score from an estate sale. It’s some type of seersucker, but most likely a poly version, which means I’d already delegated it to the “wearable muslin/kid” section of my stash. I love having a few good lengths of stress-free fabrics like this in my stash. It takes the fear out of experimenting with new designs and styles, but still makes a fun, wearable item if I do end up liking it.

back4

Now, let me talk about the design a little, because it is something you can easily replicate yourself. I used my Branson Top pattern as a base because I love the more fitted back and slightly dropped shoulders of that design. You could use any TNT top version that you already have on hand.

Here are the steps I took in making the modifications:

  1. Removed the CF seam and traced the front and back pieces in full. You won’t be able to cut any pieces on the fold because the pieces are all asymmetrical.
  2. I raised the front hemline to match the back (the front hem dips lower in the Branson top).
  3. I brought the neckline of one shoulder seam in towards the neck by 1.5 inches.
  4. Sliced diagonally across the pattern pieces to create the one-shoulder shape. I shaped this line with a very slight curve in my version but you could keep the line straight. The diagram below shows the back pattern pieces, but I kept the line the same for the front.

oneshoulder

In the sleeveless version, I simply added some elastic in a strip of casing at waist level in the front of the top only (the waist is marked by the back seam above the peplum in the Branson top). The back of my top is fitted so it doesn’t need any elastic. I used pre-made bias tape for the casing.

back1

I bound the neckline with pre-made bias binding, turned to the inside to function as elastic casing for thin elastic. The neckline only needs a lightweight/thin elastic to pull it in against the body, rather than hold it up.

For my sleeved version, I just shortened the sleeve and added elastic casing.

back8

These tops were both super easy to make and will be a fun addition to my wardrobe for the last half of Summer.

back5


A Mini Chloe production line and pretty new labels

It all started when my daughter’s little friend pulled me aside one day and whispered, “I really, REALLY love Harper’s dress”. And that was just the icky poly tester version I made her. The poor child was suffering though the heat and weight of it that day, but she still refused to take it off.

minic3

Also about this time, the Dutch Label Shop contacted me to see if I’d like to try out some of their labels  . I was given the labels for free. It was such a busy time for me that I very nearly didn’t take them up on their offer, but I’m glad I did.

I uploaded my own design to be made into a Woven Logo Label and I absolutely love how they turned out. I didn’t expect the lines to be so defined and clear. They really do look great. The service was also excellent. They have a representative on hand to check the designs to make sure they suit the label and they contact you if needed. These labels are a little larger than what I’d normally put on a kid’s dress, but in real life, I’m much more likely to put a nice label on a coat or jacket and these will suit that perfectly. I also rarely sew for anyone outside of my direct family and I don’t make a habit of labeling everything I make. However, there is something very nice about the finishing touch that a label gives the garment.

label3

But back to my production line of Mini Chloe’s, which include some of those dresses in the picture above. The first off the rack was made in pink fabric  as requested by the little admirer. It’s the only dress I didn’t get around to having modeled (P.S. my models charge me actual money for photo shoots these days!). It’s also not my best work sewing-wise, but the fabric is divine. It’s a vintage cotton or mixed natural fibre, but it feels like washed silk. I was in a big rush to get this dress done to surprise the little girl.

Then, I made her two sisters each a version. I used some Art Gallery voile for the little sister.

mmag3

And a beautiful mix of silks for the eldest girl. These ones are a special gift so I took care with the making of them.

cchjuly3

cchjuly5

Then, I felt guilty about my middle child only having that horrid (but spritely yellow) polyester version. So I scrounged through all my scraps to discover that I had enough fabric left to whip up a rayon and silk version in her size. This one will be lovely to wear. She already has a matching skirt in this fabric, so she immediately fell in love with the dress.

cchjuly2

But that’s not all. I was sorting through my small remnants of silk and rayon for middle child’s dress, my daughters were taking delight in recalling the clothes I’d sewn with all the different fabrics. They came up with the idea of “friendship dresses” for their closest friends (who also happen to be sisters). The plan was to incorporate fabrics in the friends’ dresses that I’d already used for theirs (so they could match). I had to use a bit of creativity to find enough fabric, but adding panels to the dress design made it easy. The second one will be on Instagram soon.

ccjuly2

I love this little dress pattern and I love my new labels. The dress is so quick and easy to sew that it makes gift-sewing a breeze and the labels add the perfect final touch. I have no doubt that those cold-shoulder sleeves will be out of fashion at some point, but the dress is still a simple, classic shape. I might try sewing it sans-sleeves next summer.